(Documentation work in progress: 2024-01-29)
Welcome to Phenix, a groundbreaking Blender add-on that transforms your particle animations into a realm of endless creativity. Powered by an innovative additive particle system, Phenix introduces a spectrum of custom made nodes, each designed to bring your vision to life. Whether you're a seasoned animator or a newcomer, Phenix offers an intuitive interface and a versatile toolkit to craft intricate particle effects with ease.
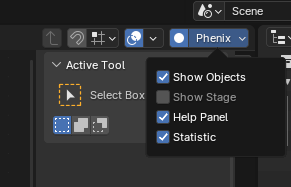
To access Phenix tools:
Show Objects
Toggle on/off to display only the objects
utilized in the simulation.
Show Stage
Enable to draw color on the node
header, indicating its execution stage.
Help Panel
Toggle on/off to reveal detailed information about the node.
Statistic
Toggle on/off to view simulation statistics,
such as the number of emitters, particles, objects, etc., used in the
simulation.
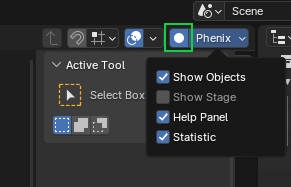
Record
Globally disable/enable the simulation.
Setting up the layout window
Setting up the layout window like in this way it is much easier to create particle animations.
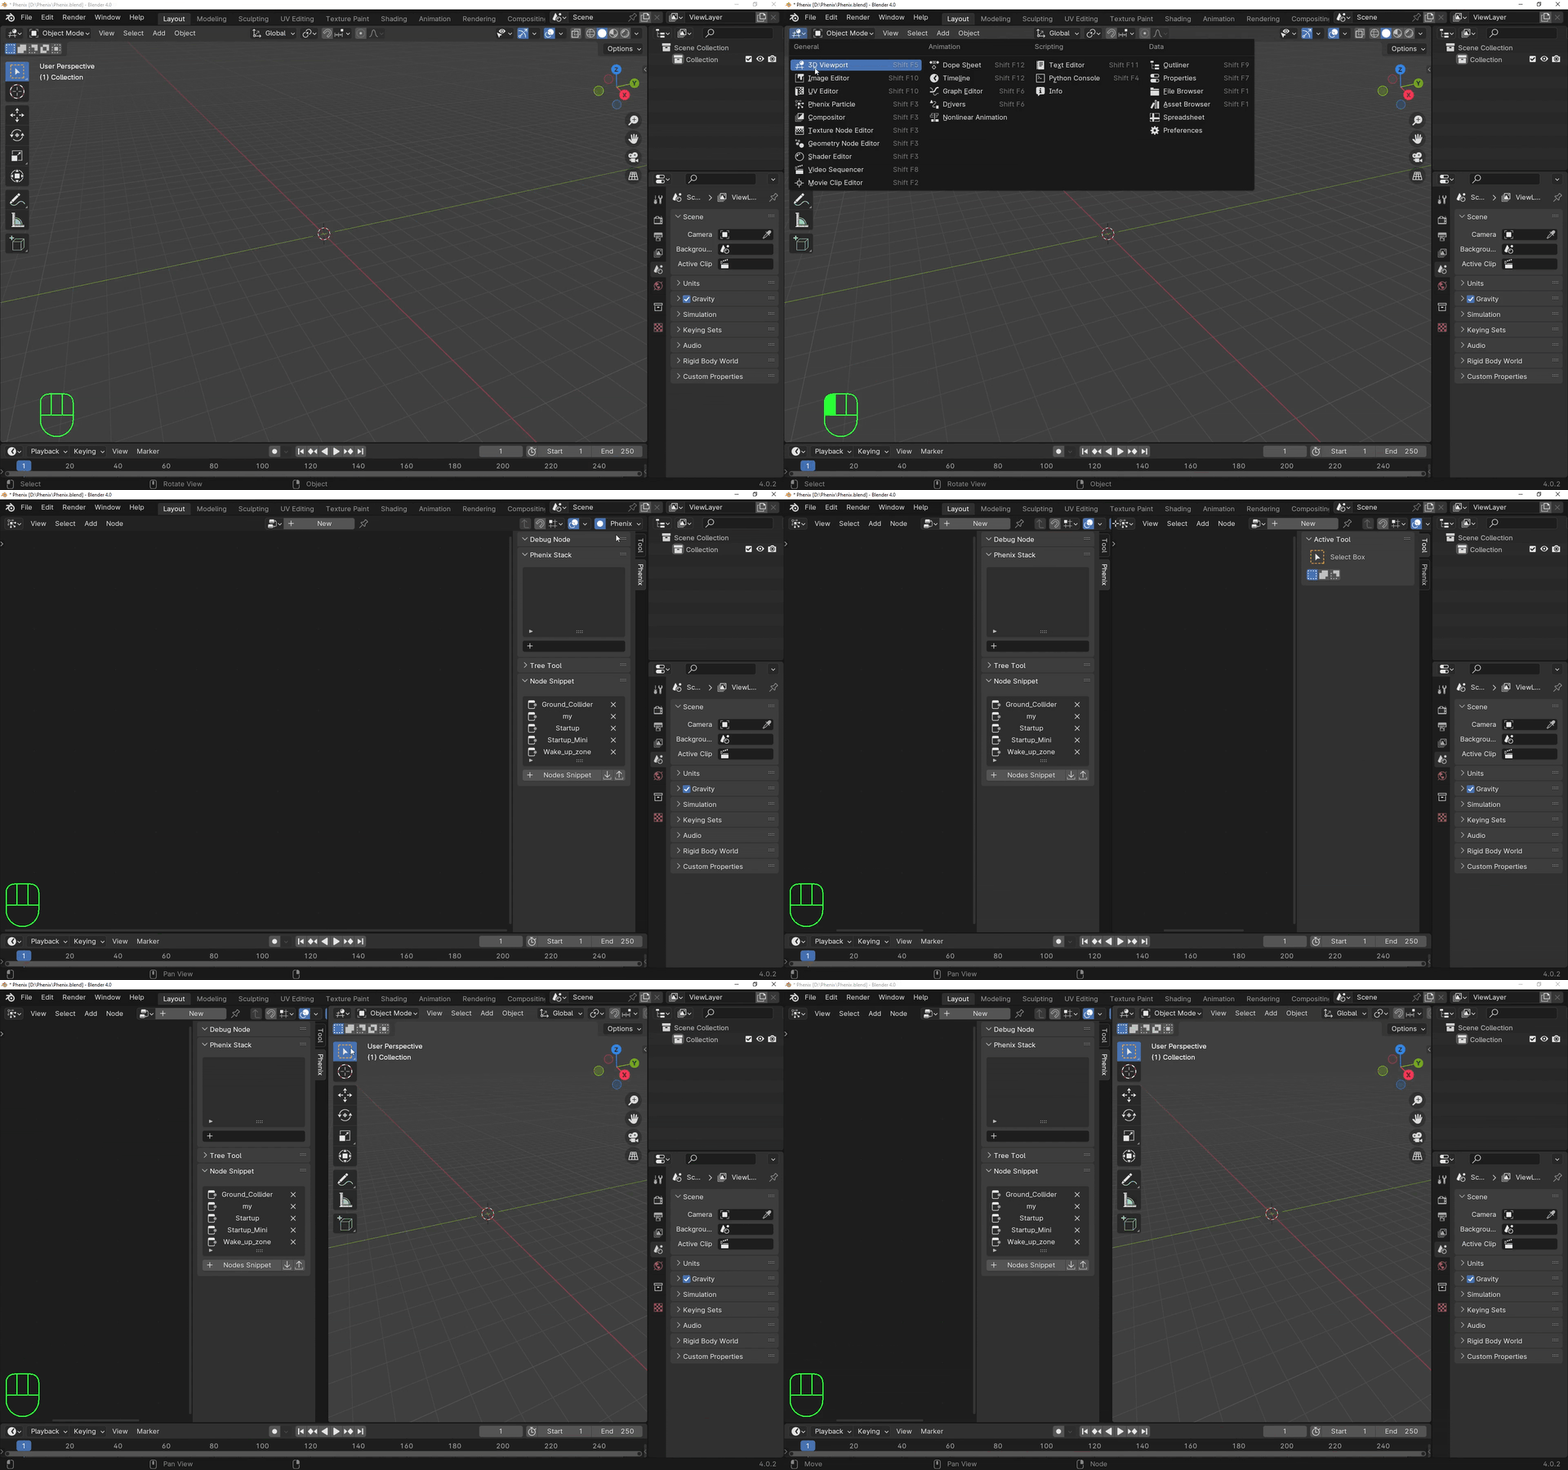
Creating a Node Tree
Creating a Node Tree and adding nodes to that Particle Node Tree exactly like in the way you do it in Shade Editor.
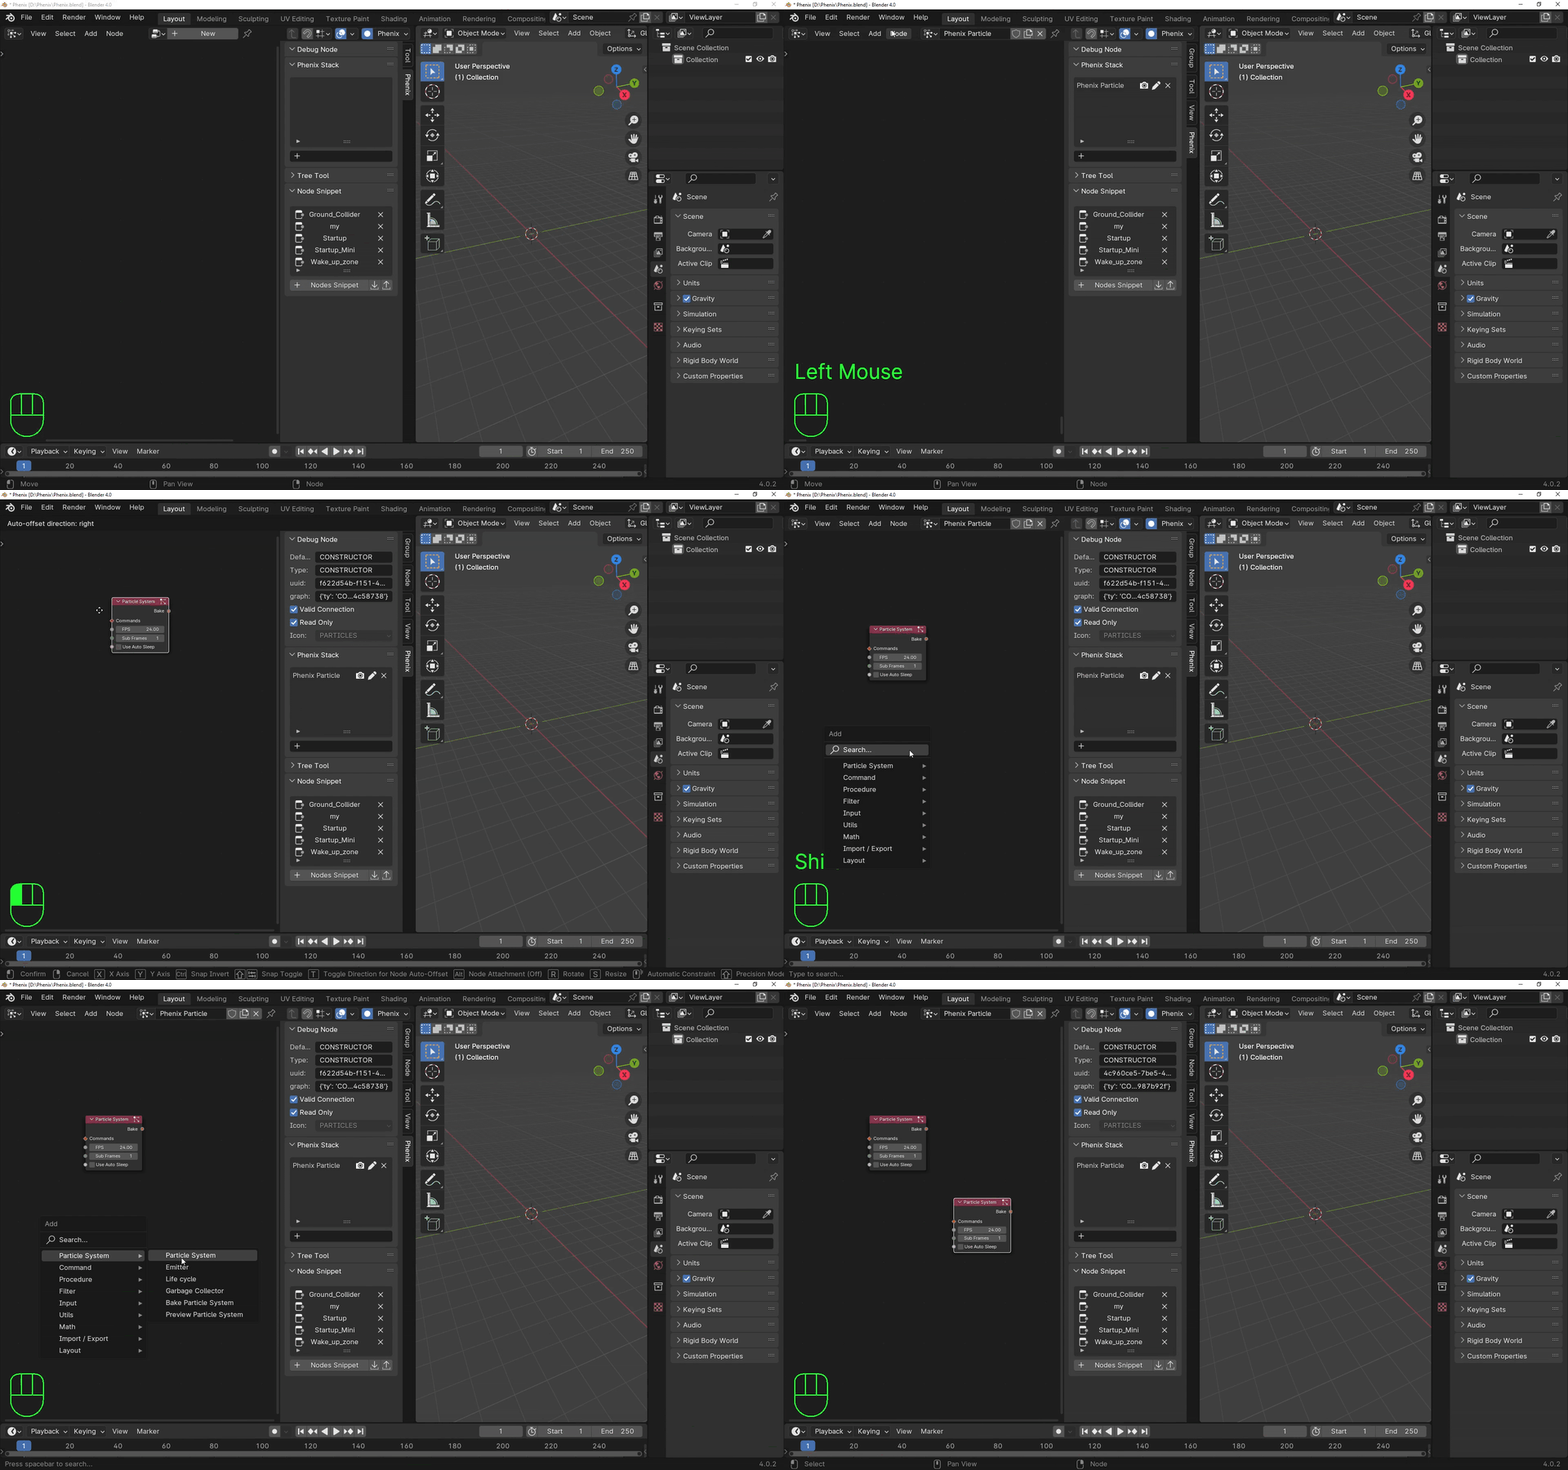
Exploring Phenix Stack Features
As you create Node Trees, they seamlessly integrate into the Phenix Stack, offering a centralized hub for managing your particle animations. Here's a guide to exploring and leveraging the features within the Phenix Stack
Icon Functionality
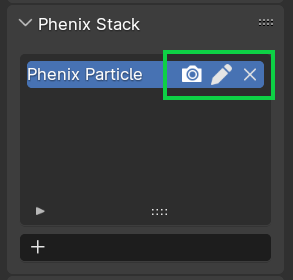
Camera Icon:
The Camera Icon offers a convenient option to manage the visibility of the selected particle animation in the 3D Viewport.
Here's how you can use it:
Pencil Icon:
In Phenix, selecting a node tree doesn't automatically put you in edit mode. To make modifications to a node tree, you need to utilize the Pencil Icon.
Here's a clear explanation:
Cross Icon:
The Cross Icon in Phenix offers a straightforward way to delete a node tree.
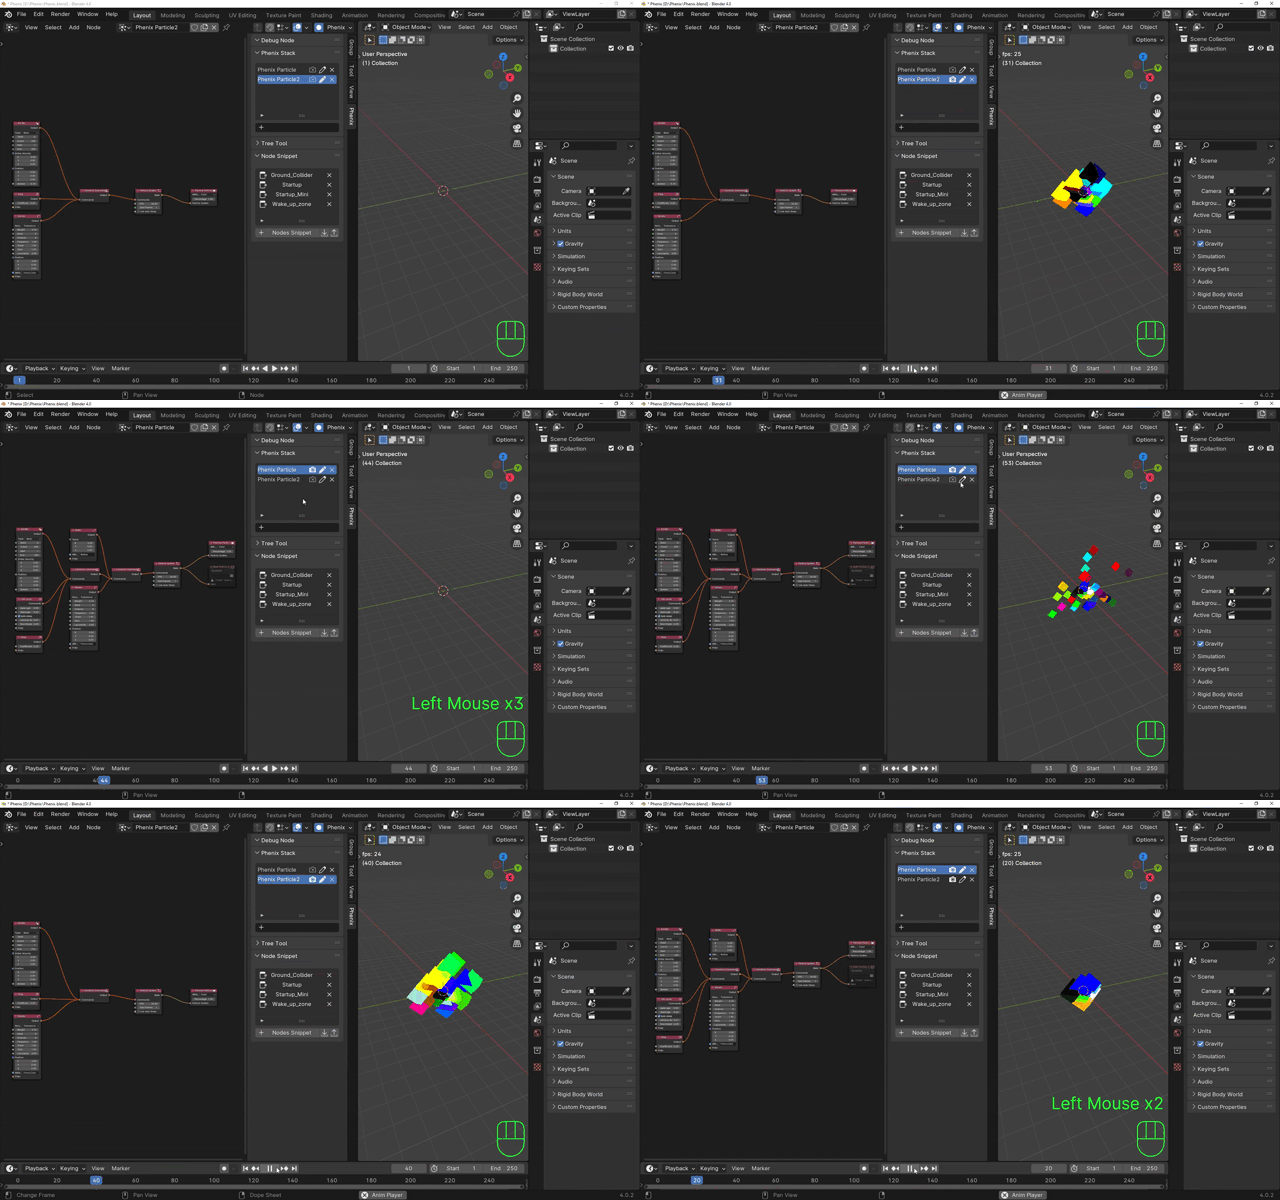
NOTE: Any modifications made to the Node Trees or their individual nodes take effect when you play the animation from the beginning. This ensures that you observe the real-time impact of your modification in the 3D Viewport.
Exploring Tree Tool Features

Uncover the capabilities of the Tree Tool in Phenix, a feature designed to
streamline node stage management for selected nodes. Utilize the Tree Tool to
conveniently set node stages for selected nodes, enhancing control over the
simulation process.
Note that not all nodes support stage assignment. For nodes with accessible stage settings, pressing the 'F' key on your keyboard triggers a pop-up menu, allowing you to designate the node stage.
Available Node Stages:
Understand the various node stages you can set:
Constructor: Evaluated once at the beginning of the simulation.

Constructor End: Evaluated once after Constructor.

Frame Constructor: Evaluated once before updating each frame.

Modifier: Evaluated for every frame after Frame Constructor.
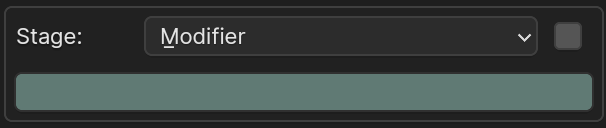
Frame End: Evaluated for every frame after Modifier.

Finished: Evaluated once at the end of the simulation.

Exploring Node Snippet Features
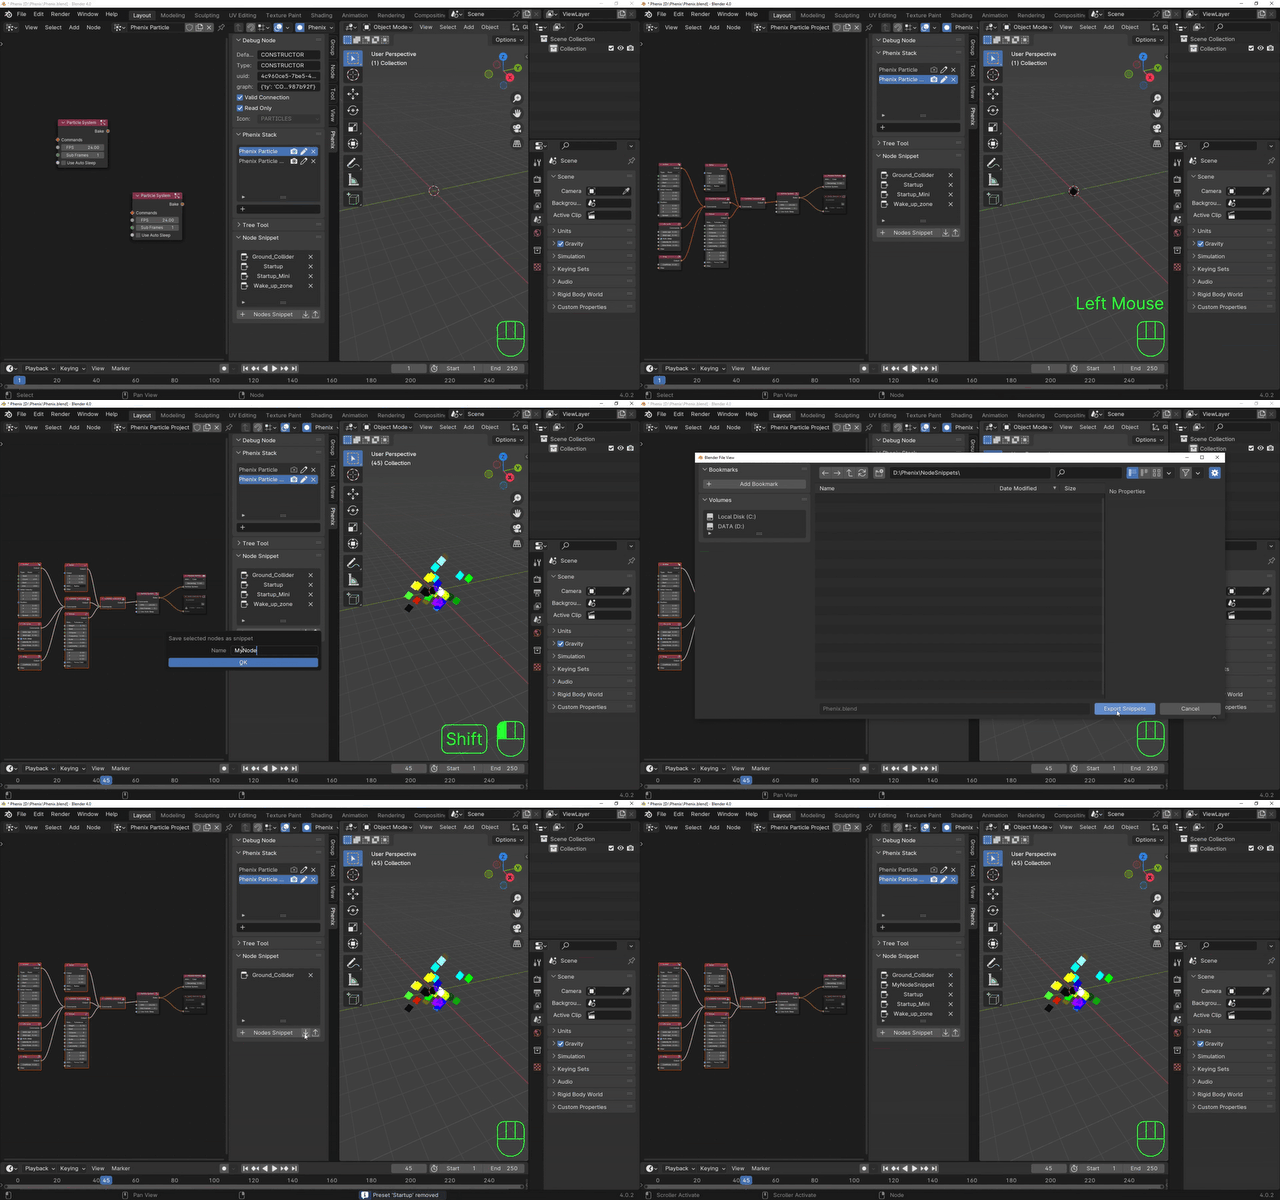
Node Snippet in Phenix Particle is a powerful tool designed to simplify your particle animation workflow. It functions like a preset, offering numerous features to enhance your creative process.
Here's how you can leverage the capabilities of Node Snippet:
Preset Node Groups:
Node Snippet contains various pre-arranged groups of nodes, serving as presets. Choose the node group that aligns with your project requirements to kickstart your animation effortlessly.
Create Custom Node Snippet:
Tailor Node Snippet to your needs by selecting specific nodes and creating custom groups. This feature allows you to efficiently organize and reuse node setups in future projects.
Export and Share:
Share your creative setups by exporting Node Snippet. This enables collaboration and allows others to benefit from your unique configurations.
Import Node Snippet:
Likewise, enrich your library by importing Node Snippet shared by others. Expand your toolkit and experiment with diverse node configurations.
Delete Unwanted Snippets:
Maintain a clutter-free workspace by deleting Node Snippets that are no longer needed. This ensures a streamlined and organized Node Snippet library.
Node Snippet is your go-to resource for accelerating your particle animation projects, offering flexibility, collaboration possibilities, and efficient management of your creative assets in Phenix Particle.
Baking the Particle Animation
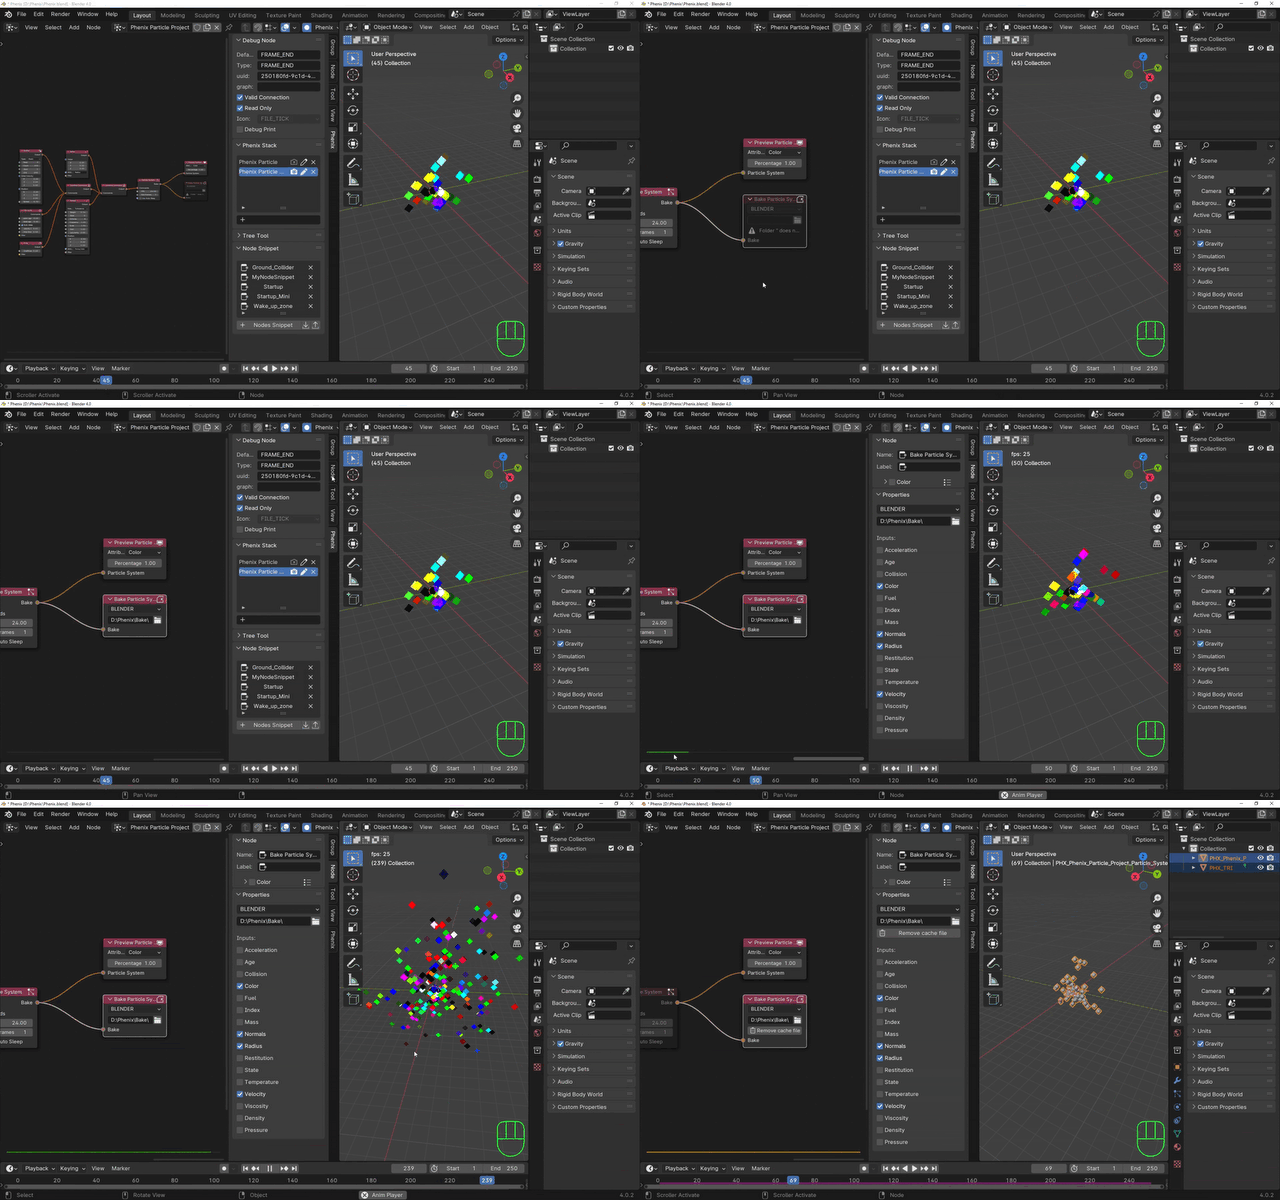
Before initiating the particle animation baking process in Phenix, ensure you
follow these steps for a smooth experience:
Save Your Blend File:
Begin by saving your Blender project file to secure your progress.
Un-Mute the Bake Particle System Node:
If the Bake Particle System Node is muted (if it is, the node will be greyed out), unmute it by pressing the 'M' key on your keyboard. This ensures the system is ready for baking.
Set Path in Bake Particle System Node:
Access the Bake Particle System Node and set the desired path for the animation bake. This defines where the baked data will be stored.
Enhanced Control Options:
For more control over the baking process, select the Bake Particle System Node and navigate to Node Properties. There, you can add attributes to bake according to your preferences.
Initiate Baking:
To commence the baking process, simply play the animation from the beginning. Phenix will start baking the particle animation based on your configured settings.
Final setting for Rendering the Animation
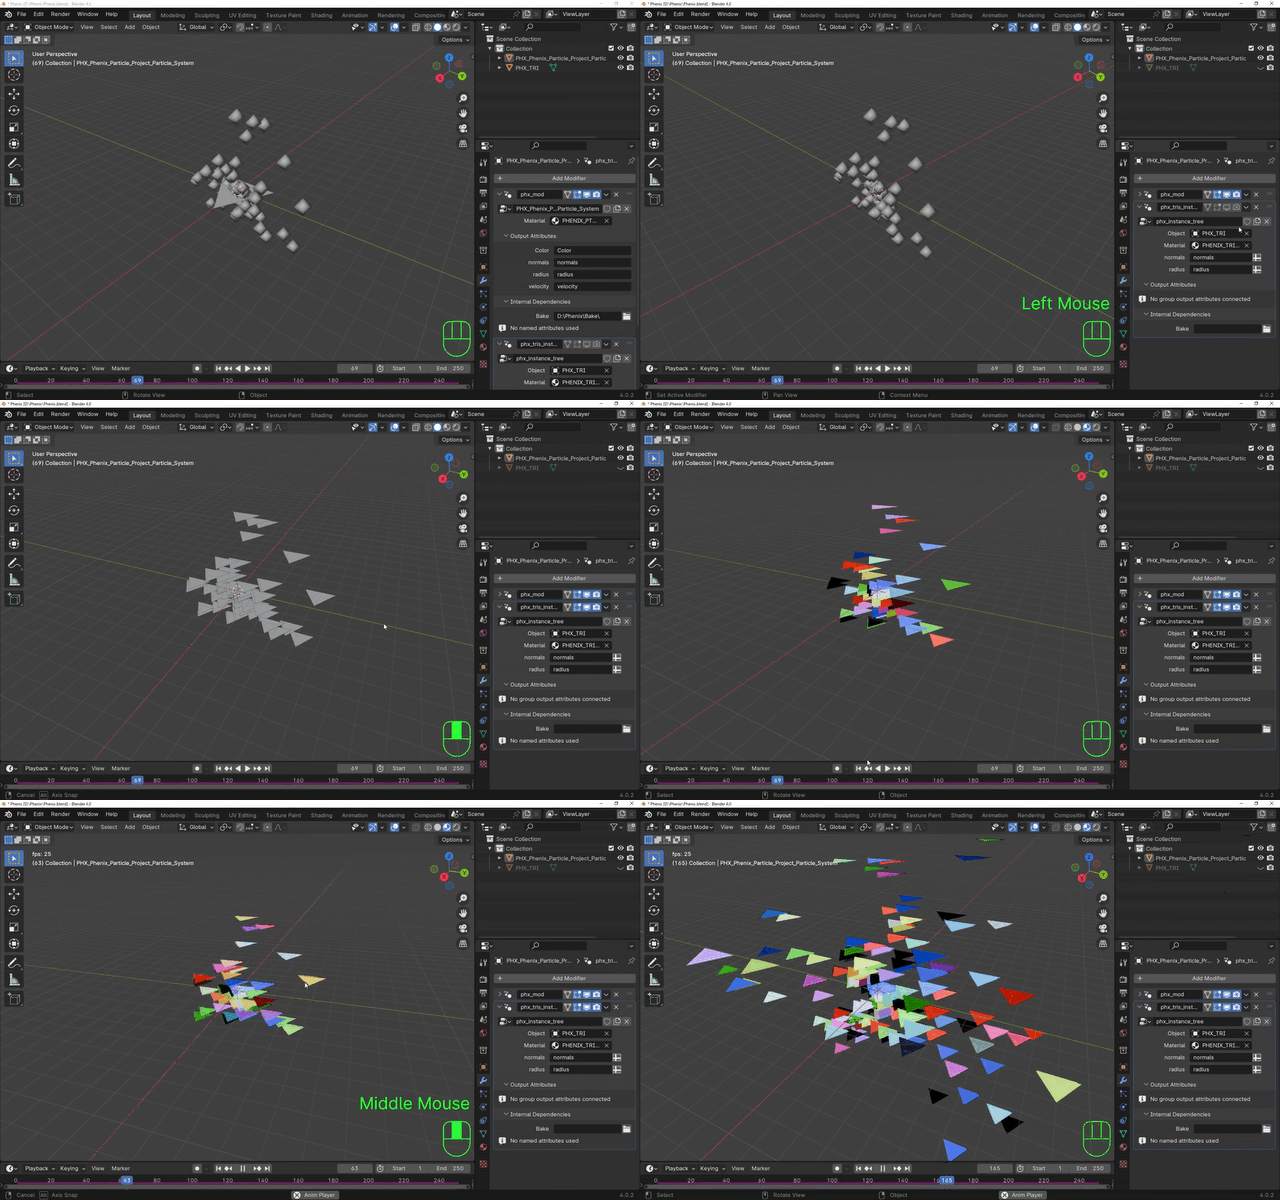
As you approach the final stages in Phenix, prepare for rendering by making a small adjustment in the modifier. as illustrated in the GIF
Here's the reasons you need to do this manually at the end:
Render Optimization in Cycles:
Phenix Particle is optimized for rendering billion-point clouds in the Cycles render engine. Leverage this efficiency when working with extensive particle setups.
Eevee Considerations:
Note that the optimized cycle setting may not be supported in Eevee. In such cases, instances or alternative models can be used to achieve performance with reduced computational demands.
Instance Replacement:
Consider replacing mesh instances with lightweight models, such as a fly model for intricate patterns or a bird for boid FX simulations. This helps balance performance and visual impact.
Integrating Rotation Nodes:
Introduce rotation nodes within the particle graph and bake rotation attributes for instances. This enhances control over the orientation of the instances, crucial for achieving specific visual effects.
By understanding these considerations and manually adjusting settings as
needed, you tailor Phenix Particle Animation to meet the specific demands of
your particle animation, rendering efficiently across different scenarios and
rendering engines.
Phenix features distinct categories of nodes, acting as the building blocks where creativity comes to life in animations. These categories are like specialized tool sets, each unlocking unique capabilities for shaping and refining your creation of animation. Let's take a closer look at these categories, breaking down the technical aspects into easily understandable terms.
This category of nodes allows you to create the particle system and setup the core.
Think of Command nodes as directors for your animation sequences. They contain pre-built FX to use in your animation.
This category allows you to talk directly to the Phoenix using a set of rules that define a custom command. You need to use the node 'apply math (proc)' to send the command to the program.
These nodes allow you to filter the particles based on various criteria. They enable you to shape and enhance the aesthetics of your animations, bringing your creative vision into focus.
Input nodes allow you to seamlessly incorporate user inputs, making your animations respond to external actions.
Utils are like the handy tools in your animation toolbox.
Math nodes bring precision to your animations. They allow you to use mathematical operations to control various aspects.
Bridge the gap between Phenix and external assets. The Import/Export nodes facilitate seamless integration, allowing you to import and export data effortlessly, enriching your animations with external elements.
Layout nodes help you organize your animations effectively.
Explore the core nodes in Phenix that form the backbone of your daily animation endeavors.
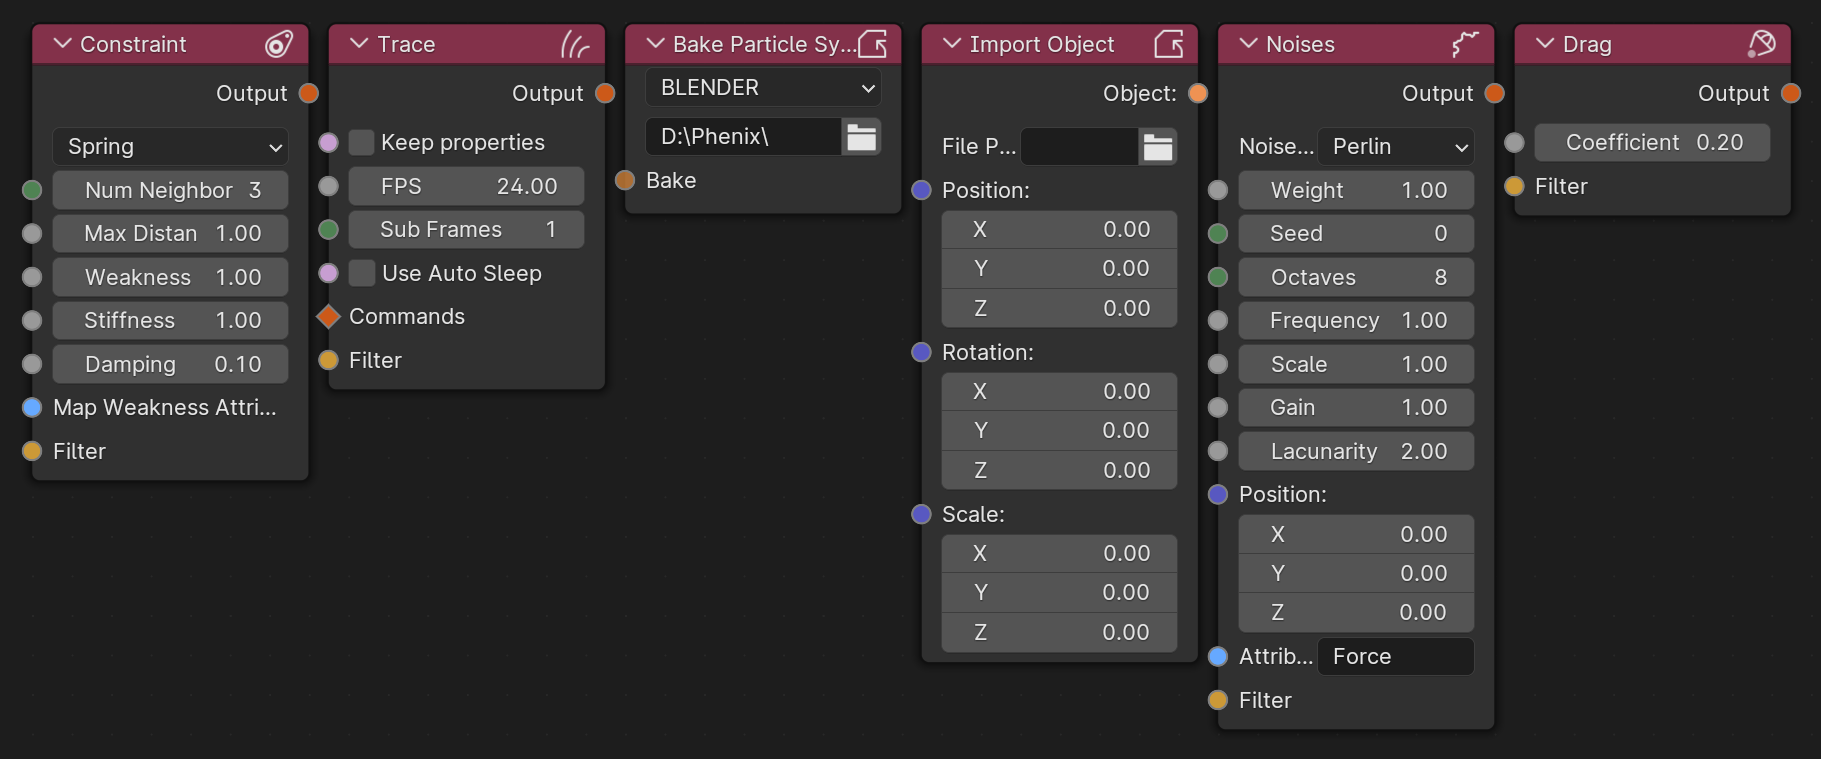
Ideal for network effects like cloth and rope, the Constrain node adds realism by governing the interactions between elements within your animation.
Dive into recursive visualization with the Tracer node. Witness the mesmerizing movement of particles as they leave a trail, offering a dynamic visual representation.
Elevate your visual effects by converting Phenix particles into geometry nodes using the Bake node. This step is crucial for enhancing the overall visual appeal and rendering of your animations.
Seamlessly incorporate external elements by streaming .obj and .las files as particles in your scene using the Import Object. This node expands the possibilities of your animation toolkit.
An indispensable node found in most setups, Noise comes in various types such as Perlin, Cellular, Cubic, Curl, Turbulence, and the upcoming Musgrave. Use this node to dynamically drive particle attributes, including movement, color, and radius, achieving a wide array of visual effects.
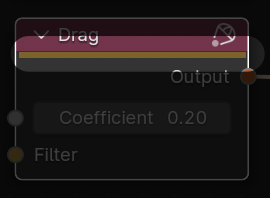
A must-have for natural-looking simulations, the Drag Node introduces an element of realism by causing particles to slow down when no external force is acting upon them.